Round Knots
|
| |
 |
| Cloud
Knot
Seal of Solomon |
| |
| |
|
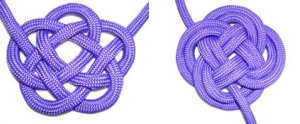
Description: Round Knots
can be used as pendants, or for items like pot
holders, coasters, and even small rugs.
On this page are two interesting decorative
knots that are round and have the woven elements
common in Celtic designs.
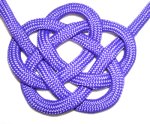
The Cloud
knot starts with a Josephine
knot. There are two additional
loops at the bottom.
The Seal
of Solomon is sometimes called the Flat
Turks Head knot.
It is a vintage historical knot known by many
Celtic artists. It also begins with a Josephine
knot.
|
| |
| |
|
I found the Cloud Knot on the Fusion
Knots website Designs
by J. D. Lenzen.
Be sure to visit by clicking on the
image or link.
The video
gallery contains
tutorials for a variety of very
unique and appealing knot designs.
|
|

|
|
| |
|
|
|
|
| |
Cloud Knot
|
| |
| |
The Cloud Knot is the
easiest of the two round knots shown on this page.
The first 3 steps below describe the process for
making the Josephine knot. |
| |
|
| |
 |
|
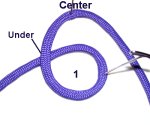
Step 1: Fold a
36-inch cord in half and secure it at
the center.
Make a counter-clockwise
loop with the left
half. The end should pass under
to make the crossing point.
|
|
| |
|
| |
 |
|
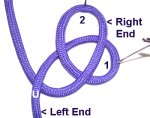
Step 2: Bring the right end down,
across the center of the first loop,
resting on top of it. This creates a
second loop.
Before moving on to the next step,
pass the right end under
the left.
|
|
| |
|
| |
 |
|
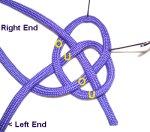
Step 3: To create the
third loop, bring the right
end to the top of the knot.
Weave it over
- under - over - under the four
segments of loops 2 and 1.
|
|
| |
|
| |
|
Design Tip: Both of these
Round Knots feature changes at the bottom.
Make sure you follow the instructions for the
bottom areas closely.
|
| |
|
| |
 |
|
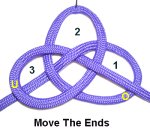
Step 4: Re-arrange
the end on the right
so it rests over
the lower portion of Loop
1,
rather than under it.
Do the same with
the end on the left,
arranging it so it rests under
Loop 3, rather than over it.
|
|
| |
|
| |
 |
|
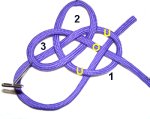
Step 5: Move the end
on your left
to Loop
1.
Weave it under
- over - under the 3 segments,
moving upward on a diagonal slant.
|
|
| |
|
| |
 |
|
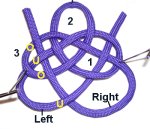
Step 6: Move the end
on your right
to Loop
3.
Pass it under
the left end in the center.
Weave it over
- under - over the three
segments heading upward.
|
|
| |
|
| |
 |
|
Round knots need to be balanced, so
take your time as you tighten this knot.
Use a second cord if you wish to
double the knot.
|
|
| |
|
|
| |
 |
|
|
|
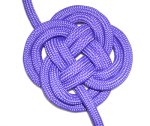
| |
Seal of Solomon
Represents
fire, water, and balance.
|
| |
|
| |
|
|
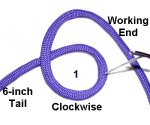
Step 1: Secure one end
of a 60-inch cord to your board.
Make a
clockwise loop
6
inches from the end.
Bring the working end up in an arch
above the loop and secure it.
|
|
| |
|
| |
 |
|
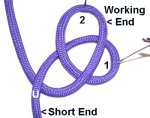
Step 2: Bring the
working end down, passing over
the middle of the first loop.
This creates Loop
2.
Bring the working end under
the secured end.
|
|
| |
|
| |
 |
|
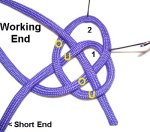
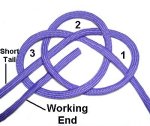
Step 3: Bring the
working end through loops 1 and 2,
weaving over
- under - over - under.
This creates the third loop on the
left.
|
|
| |
|
| |
Step 4:
Tighten and balance the knot so all three loops
are the same
size.
When you are first learning to make round knots
like this one, enlarge the loops so they are
around 2 inches in size, to give you room to work. |
| |
|
| |
 |
|
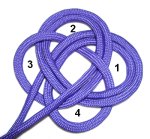
Step 5: Move the
working end clockwise
to the left so it's to the right
of the short
tail,
inside Loop 3.
This will make a 4th loop at the
bottom, which is shown in the image
below.
|
|
| |
|
| |
 |
|
Step 6: Use the
working end to follow
the path of the
knot, all the way through.
This image shows the doubling in only a
portion of the knot. The image
below shows the completed process.
Make sure the second portion stays on
the same side of the loops in the first
half.
|
|
| |
|
| |
 |
|
Round knots can be a challenge to
tighten and balance.
The best approach is to remove the
slack in the order the loops were made.
Start by tightening the first knot and
then tighten the doubled portion.
|
|
| |
| |
|
|
By
using any text or images on Free Macrame
Patterns, you are agreeing to our Terms
of Use
|
|
|
| |
|
Have
any comments about these Round Knots? Contact
Me.
|
|
|
|

|
|
| |


